Sculpt Deformer Layer
It is possible to sculpt any asset with geometry in Rumba. That sculpt can even be animated and make use of some animation tools.
Create a Sculpt Deformer Layer
To create a Sculpt Deformer Layer:
Select part of the asset you want to sculpt (a controller for a rig asset or an object of a USD/Alembic asset)
In the Layers view, Right Click on the
 button, or go to the Layers menu, then select Create Sculpt Deformer
Sculpt an asset
To start sculpting an asset, Left Click the  button on the Sculpt Deformer Layer in the Layers view.
Sculpting with sculpt tools
Once the sculpt is activated, the default tool is the Sculpt tool.
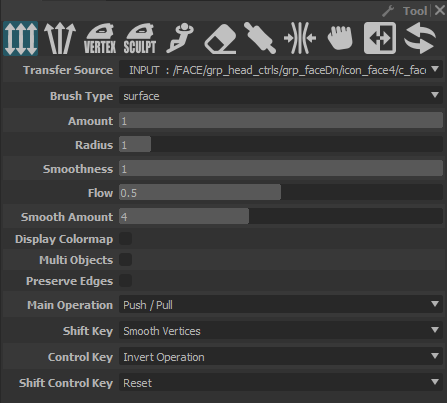
The different brush options:
 : Push/Pull, add volume to the geometry
 : Inflate, add spherical volume to the geometry
 : Smooth Vertex, equilize the distance between the vertices
 : Smooth Sculpt, smooth the sculpt of the sculpt
 : Relax, smooth the vertices while conserving the shape and volume of the Mesh
 : Erase, erase the sculpt on the vertices
 : Flatten, flatten the vertices w.r.t. the normal at the brush center
 : Pinch, move the vertices to the center of the brush
 : Grab, grab vertices and move them
 : Mirror, sculpt copying the sculpt on the other side of the geometry (left/right)
 : Transfer, transfer sculpt from one geometry to another. Using Transfer Source as the source of the transfer
Other options:
Brush Type allows you to change the way the brush selects vertices to sculpt. surfaces is everything that is under a circle that start at the center of the brush. volume is the same as the surface option, but it takes a sphere instead of a circle. geodesic is a smarter volume option.
Amount is the value applied with one drag of the Left Click.
Radius is the size of the brush.
Smoothness handles how the vertices are affected starting from the center of the brush. A lower value means the further a vertex is from the center of the brush, the lesser the value of sculpt is applied. A higher value means the vertices farther from the center are affected like the center (which is the full value of the brush).
Flow is the percentage of Amount that will be applied with one drag of the Left Click.
Smooth Amount is the quantity of smooth that will be applied by the Smooth Vertex and Smooth Sculpt.
Display Colormap lets you see a colored representation of the sculpt on the geometry.
Multi Objects allows all individual geometries of an asset to be sculpted at once.
Preserve Edges means the vertices of edges only linked to one face don’t move.
Main Operation is the action that happens when you sculpt using the Left Click. The Shift Key, Control Key and Shift Control Key are the actions associated when their respective modifiers.
Sculpting with transform tools

When entering the sculpt mode, the toolbar on the left side of the viewport changes to add the sculpt tool to the available tools and the current tool is changed to the sculpt tool. It is possible to sculpt using the translate/rotate/scale tools directly on the vertices while in sculpt mode.
To show the vertices, first, switch to the select tool, Right click on the geometry you want to affect then Select->Vertices. Alternatively, with nothing selected, hover the desired geometry then press F8. To hide the vertices again, repeat the steps taken to show the vertices.
Once the vertices are shown, you can select them using the selection tool then use the translate/rotate/scale tools to affect the selected vertices. You can also use this method to isolate vertices you want to sculpt by switching back to the sculpt tool.
Animate a sculpt
To animate the sculpt of an asset, select the Sculpt Deformer Layer. In the Channel View, select the Delta Points channel and press S to key it. A key appears in the timeline of the Sculpt Deformer Layer that you can move to your convenience. Now everytime you start a sculpt on a new frame, a key will be created.
Animation tools from the Main Window’s toolbar can be used on the Delta Points channel : Breakdown, Reset Pose to Default and Undo Blend.
Note
You can reset the sculpt by selecting the Delta Points channel and pressing D.