Sequencer
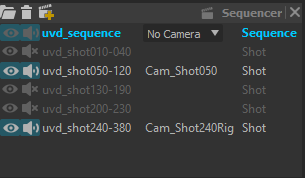
The Sequencer lists the documents that are either a sequence or a shot, with the sequencer camera for each.
The Sequencer is used to manage a sequence and its associated shots. A sequence is a special type of Rumba document (with the .rumbaseq extension) that can reference other Rumba documents (.rumba files), referred to as shots. These shots can be added to a Media Layer to preview the assembled sequence directly in the viewport.
This setup makes it easier to create smooth transitions by allowing you to copy and paste poses from one shot to another. Within the Media Layer, shots can also be trimmed, resized, slowed down, or sped up without altering the original referenced documents.
Additionally, you can assign a specific camera to act as the sequence camera for each shot. During playback, the viewport will automatically switch between the shots’ assigned cameras, providing a seamless viewing experience.
Create a sequence
When a shot is opened, an empty sequence document is always created. It is identified as Sequence in the Sequencer widget.
Double click on a document to make it the current active document.
Add a shot to a sequence
Click on the  button to add an existing shot to the sequence.
Click on the  button to create a new empty shot in the sequence.
Note
When adding an existing shot to the sequence, its default status is Unloaded.
Set a shot’s status
Right click on a shot then select the status between : Editable, Read Only or Unloaded
Add a clip to a media layer
A shot document can be added as a media clip in any media layer in the sequence document (it does not work in shot documents).
Drag and drop a shot from the Sequencer widget to the media layer’s timeline at the desired frame.
Note
A media layer named Sequence is created in the default sequence document.
See also
See the Media Layer section for more information on the media layer and media manipulation.
Select a sequencer camera
To select the sequencer camera of a shot document, activate the desired shot, then select a camera from the shot as the reference camera in the Sequencer Widget.

It is possible to override the sequencer camera of a shot document per clip in the timeline. To do so, Left Click on a clip in the timeline, then, in the Attribute Editor, change the Camera attribute.
The chosen cameras will be used when SequencerCamera is the selected camera in a Viewport.
Note
In the sequence, when the SequencerCamera is the current camera in a Viewport, it is the sequencer camera of the top most media layer’s shot that will be displayed.
Save a sequence
Double click on the sequence document then CTRL + S.
Note
If there is one or more edited shot document in the sequence, a pop up will propose to save them too.
Conform a shot
When cutting/moving/resizing/changing the speed of a shot clip in a sequence (see Media Layer), the shot document is not modified, only the way it is read in the sequence. There is a way to apply the changes made in the sequence to the shot document. It is called conforming the shot.
To conform a shot document, Right Click on the shot in the Sequencer widget and select Conform Document.
Options
When conforming a shot, the following options will be proposed:

Conform Shot Range: If the clip was cut or resized, check this option to conform the time range of the shot to that of the clips
Conform Animation Curves: Whether the curves of the shot will be adapted or not to the current clip form (eg. if the clip was accelerated, transforms the curves inside the shot to fit the acceleration)
Conform Media Clip: Whether the media clips inside the shot will be adapted or not to the current clip form
First Frame: When Conform Shot Range is checked, set the new first frame of the shot
Shot First Frame: Keep the current first frame of the shot document
Sequence First Frame: The frame where the first clip of the shot sits is the new first frame of the shot (eg. is the clip starts at frame 14 on the sequence timeline, the new first frame of the shot will be 14)
Custom First Frame: Set the new first frame by hand
Crafting a new sequence using script
import rumba
import rumbapy
import rumba_ext

rumba.new_document()

# Get the current sequence and switch to it
sequence = rumba_ext.sequence()
sequence.plugin().set_active()

# Suppressing all Shots from the sequence
for child in rumba.workspace().child("documents").children():
        if not child.plugin().is_sequence() :
                child.plugin().set_state(rumba_ext.RumbaDocument.State.unloaded)
                rumba_ext.remove_shot_media("doc:" + child.full_name(), True)

# Shots' paths
doc1 = "/my/project/anim1.rumba"
doc2 = "/my/project/anim2.rumba"

# Create a MediaLayer
layer0 = rumbapy.add_media_layer()

# Create Media and add it to the layer0
(media1, clip1, last_frame) = rumba_ext.add_shot_media(doc1, rumba_ext.RumbaDocument.State.editable, 1, layer0, True, True)

# You can add the same shot multiple times that way
(media1, clip2, last_frame) = rumba_ext.add_shot_media(doc1, rumba_ext.RumbaDocument.State.editable, last_frame, layer0, True, True)

# You can add a shot without loading it
(media2, clip3, last_frame) = rumba_ext.add_shot_media(doc2, rumba_ext.RumbaDocument.State.unloaded, last_frame, layer0, True, True)

# MediaClips of documents expose a frame based API
clip1.frame_offset.set_value(10)
clip1.frame_clip_in.set_value(31)
clip1.frame_clip_out.set_value(60)

# Here we add another MediaLayer on top, it will play simultaneously
layer1 = rumbapy.add_media_layer()
(media3, clip4, last_frame) = rumba_ext.add_shot_media(doc2, rumba_ext.RumbaDocument.State.unloaded, 1, layer1, True, True)