Shelf Content
 Send To Rumba
Creates an asset file (.rumbanode) containing the selected group in the scene (or the first one if there is no selection) then opens a new Rumba scene referencing the asset file. Ideal to test your export.
 Export To Rumba
Creates an asset file (.rumbanode) containing the selected group in the scene (or the first one if there is no selection) in the scene.
 Export Animations To Rumba
Creates a Rumba animation file (.rumbaanim) with the animation of the selection. It also generates the video preview of the animation in a side by side folder.
 Import Rumba Animation
Import a Rumba animation back into Maya, over existing Maya asset references using the MTORBA animation format or directly from a .rumba file.
 Create a Manipulator for the Selected Controller
Create an already associated manipulator for the selected controller.
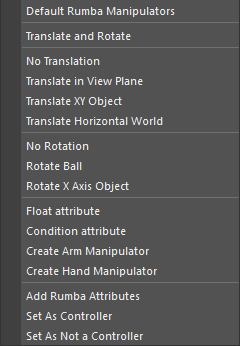
Menu

- Default Rumba Manipulators :
Select any controller of the rig then click on “Default Rumba Manipulators” to create a basic manipulator setup.
- Translate and Rotate :
Creates a manipulator with default settings for the selected controller
- No Translation :
Creates a manipulator with only rotation properties for the selected controller
- Translate in View Plane :
Creates a manipulator with only translation properties set to moving along the view plan for the selected controller
- Translate XY Object :
Creates a manipulator with only translation properties set to moving along the object’s XY local plane for the selected controller
- Translate Horizontal World :
Creates a manipulator with only translation properties set to moving along the world’s X axis for the selected controller
- No Rotation :
Creates a manipulator with only translation properties for the selected controller
- Rotate Ball :
Creates a manipulator with only rotation properties set to ball type for the selected controller
- Rotate X Axis Object :
Creates a manipulator with only rotation properties set to rotating around the object’s X axis for the selected controller
- Float Attribute :
Creates a Float Manipulator for the selected controller. The controller needs to have an extra attribute of type float. If more than one such attribute is found, you will be prompted to select wich attribute to associate.
- Condition attribute :
N/A
- Create Arm Manipulator :
Creates an Arm Manipulator. It needs a selection. See Arm Manipulator for how to set it.
- Create Hand Manipulator :
Creates a Hand Manipulator. You need to have a controller selected. See Hand Manipulator for how to set it.
- Add Shader Attributes :
Adds Rumba shader attributes to the selected object’s shader. You can find the attributes in the Extra Attributes section of the object’s shader.
- Set As Controller :
Adds the necessary attributes to a node for it to be considered a controller (by default, only curves are considered controllers)
- Set As Not a Controller :
Adds the necessary attributes to a node for it not to be considered a controller (by default, all curves are considered controllers)
 Link a Controller to a Manipulator
Associate a the selected controller to the selected manipulator. It will also set up the controller to be manipulated.
 Paint Manipulator on the selected Geometry
Select a geometry, then click on  . You will be prompted to choose which manipulator you want to paint on the selected geometry. Click again on
  to change which manipulator you are painting.
 Hide Paint on the Selected Geometry
Hide the current manipulator paint on the selected geometry. It will not delete the paint, but you can check your shading that way.
 Transfer Paint between two Geometries
Copy the manipulator paint from a geometry to another. The first selected geometry is the source paint and the second, the destination.
 Mirror Paint on the Selected Geometry
Mirror the painting on the left side of the selected geometry to its right side.
 Rename the Selected Manipulator
Rename the selected manipulator and updates the associated controller.