Animation Layers
All the animations done in Rumba are stored in animation layers. To be animated or modified, a channel must be assigned to one of those layers.
By default, Rumba creates for you an animation layer per asset, with all its channels assigned. So you can directly animate after referencing a rig.
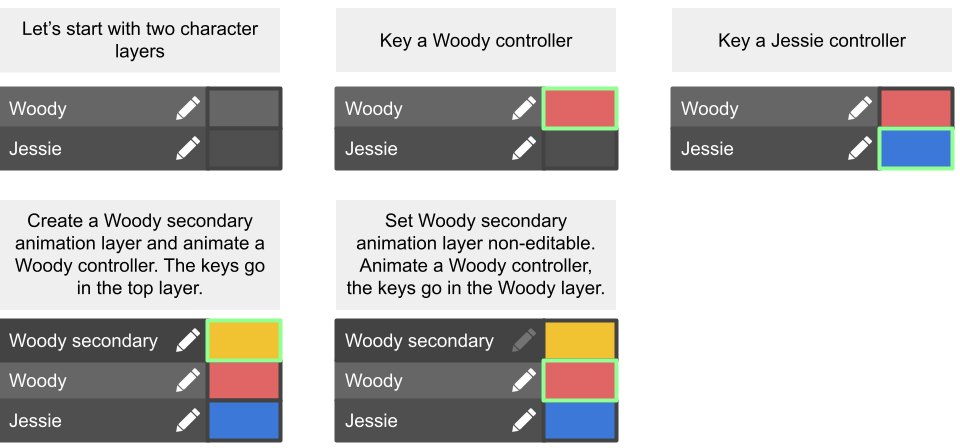
When moving a controller or adding/editing keyframes, the modifications take place in the first editable animation layer where this controller is assigned, starting by the top of the layer stack.
The new animation layer workflow introduced in Rumba v1.2.2
Note
If you prefer not using layers, create a single animation layer and assign every channels you want to animate to it.
Warning
If you are not able to move a controller, your controller is probably not assigned to an animation layer, or those layers are disabled, not editable or have a weight set to 0.0.
Create layers
Automatic layer creation
By default, when you import a rig, Rumba creates an animation layer and assigns all the rig’s channels to that layer.
Note
You can disable this feature by unchecking the Menu -> Layers -> Create Layers for New asset
Create a layer for all the asset channels

To manually create an animation layer and assign all the asset’s controllers to it :
Select any asset controller in the viewport
Select all the Asset controllers using Menu -> Select -> All Asset Controllers
Create the new layer with Menu -> Layers -> Create Layer
Create layers following the asset selection sets hierarchy

You can also create a layer hierarchy which maps the asset’s selection sets. The animation keys will be automatically stored in the right animation layer. The animation can be edited at the group level you want.
To manually create groups and layers following the asset’s selection set hierarchy :
Select an asset root node using the Node List
Create the new layer with Menu -> Layers -> Create Asset Layers
Note
You can also create animation layers with a long left click or a right click on the  button in the
Layers view:
button in the
Layers view:

Manage layers
Delete layers
To delete a layer, simply press ‘Del’ with the mouse over the Layers view.
Change layers order
To change the layer order, middle click on the layer to move it up and down. Using the same action, you can move a layer into a layer group.
Group layers
To group layers together, select the layers to group, right click on them and choose Group in the menu.
Ungroup layers
To ungroup layers, select the group, right click on it and choose Ungroup in the menu.
Merge layers
You can merge one or multiple layers in a lower layer using three different methods.
 Flatten Layer In Keys

This command flatten the selected layers into the lower layer, keeping the timing of the lower layer.
 Flatten Layer Union Keys

This command flatten the selected layers into the lower layer, keeping the timing of all the layers involved.
 Flatten Layer All Keys

This command flatten the selected layers into the lower layer, putting keys at every frames.
Using a long click or a right click in the

The result of the command configured with an interval of 2 and a 0 offset.

The result of the command configured with an interval of 2 and an offset of 1

The result of the command configured with an interval of 3 and an offset of 1.
 Flatten Layer On Tows
Using a long click or a right click in the
The result of the command configured with a 0 offset.
The result of the command configured with an offset of 1.
Note
The poses at the result keyframes are guaranty to be the same than before the merge operation. Tangents are adjusted in order for the animation between the result keyframes to be the closest possible with the original animation.
Edit layers
Enable/disable a layer
If disabled, the layer’s animations have no effect.
To enable/disable a layer, use the  button.
Add/remove channels to/from an existing animation layer
To add or remove channels to an existing layer:
Select the controllers and channels you want to add/remove
Press the
 buttons
Change the layer’s weight
Each layer has a weight to give more or less effect of the layer’s animations in the final result. A weight of 1.0 gives the layer maximum effect, a weight of 0.0 disables the layer. This weight can be animated.
To modify or animate the layer’s weight:
Select the layer
In the channel view, set the new weight
Press ‘S’ to set a weight key
Make the layer editable/non-editable
An animation layer can be editable or not. If editable, the animation layer accepts modifications on the channels previously assigned to it.
If the animation layer is not editable, no modification can be done on the layer’s channels.
To make an animation layer editable/non-editable, use the  button.
Set the layer’s color
To change the layer color, right click on the layer to open the menu and choose Edit Layer Color.
Set the layer mode
Layers have one of the three following blend modes:
Additive: the layer animations are added to the animations done by the lower layers.
Subtractive: the layer animations are subtracted from the animations done by the lower layers.
Blend: the layer animations replace the animations done by the lower layers.
Note
A layer’s weight of 1.0 gives the maximum effect of those modes. Decreasing the weight to zero, the effect of the layer blends to the result of the lower layers.

To change the layer’s mode, right click the layer and choose the new layer mode in the Layer Mode sub-menu.
Inspecting Layers
Highlight the controllers assigned to a layer
To highlight the controllers assigned to a layer, simply select the layer, the assigned controllers are now highlighted.
Select the controllers assigned to a layer
To select the controllers assigned to a layer, simply middle click on it, or use the Layer Relationship command of the right click menu.