Nodal Graph
Rumba Rig is based on a Direct Acyclic Evaluation Graph composed of Nodes, Plugs and connections.
Nodes are structured in a tree hierarchy whose root is the Rumba Workspace Node. A Node is a collection of Plugs, each of them holding a Value used for the evaluation of the Graph.
Plugs are connected to form the Direct Acyclic Evaluation Graph. A Plug may compute an output Value from the Values of other Plugs.
Node Editor
The Node Editor is the main working area for riggers. It allows to navigate through the Node hierarchy and modify the Evaluation Graph.
To see the children of a Node, double-click it. To jump out to the parent Node, double-click in the void.
The path of the currently displayed Node is given on the Top Left corner and can also be used to jump to any parent Node in the hierarchy.
Moving around the children Nodes is done using Alt + mouse middle click and move.
A Node is displayed with:
its name
its icon, rendered with its color
its main plugs, rendered as circle arcs around its icon with their name
See also
Create Nodes
Rumba Rig comes with a Node Library, that can be extended by the user.
There are two ways to import a Node from the Node Library:
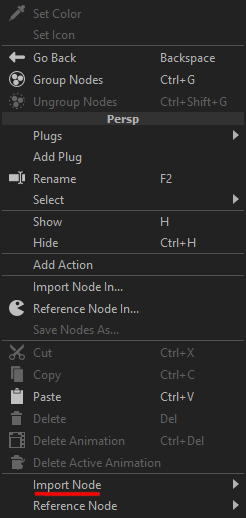
right-click in the void to open the node editor menu, then go to the Import Node sub menu at the bottom and navigate through the menus to get to the desired Node.
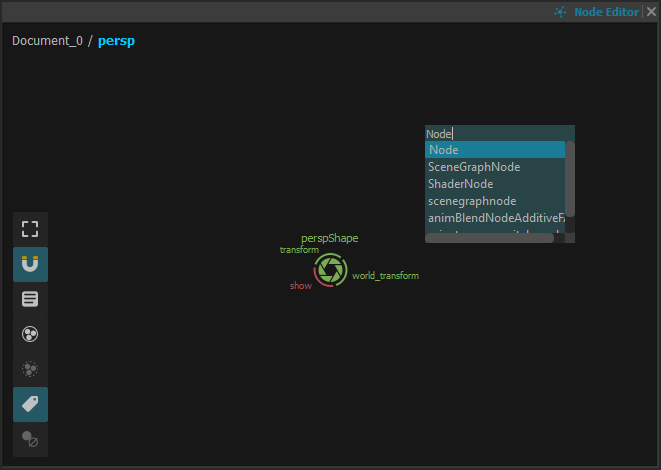
press Tab in the void, a text bar will open, then enter the desired Node type and press Enter.

Similarly, there are two ways to reference a Node from the Node Library:
right-click in the void to open the node editor menu, then go to the Reference Node sub menu at the bottom and navigate through the menus to get to the desired Node,
press Shift + Tab in the void, a blue text bar will open, then enter the desired Node type and press Enter.

Referenced Nodes are displayed frozen for instant identification: 
Note
Referenced Nodes are special Nodes that register the modifications applied to their sub-hierarchy. These modifications are saved along with the reference file so that, when opening the Rumba Document, the referenced Nodes are loaded and the registered modifications are restored.
Here is the list of available modifications of a referenced Node or any of its child Nodes:
rename the Node
change the Node color or icon (currently not saved with the other modifications)
change the Value of a non-evaluated Plug
change the description of a Plug
add dynamic Plugs to the Node
remove dynamic Plugs from the Node, as long as it does not come from the reference file (i.e. those added after loading the file)
connect Plugs of the Node from / to any other Plug (inside or outside the Node sub-hierarchy), as long as it does not break a connection from the reference file.
disconnect Plugs of the Node, as long as the connection does not come from the reference file (i.e. those added after loading the file)
adding evaluation dependencies to Plugs of the Node
However, changing the sub-hierarchy of a referenced Node is not allowed (no adding or removing child Nodes).
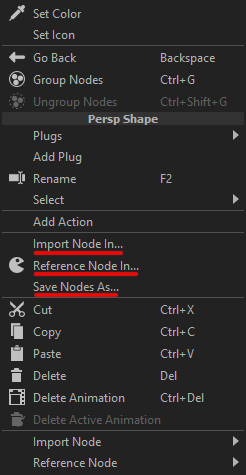
To import (resp. reference) a Node that is not from the Node Library, right-click in the void to open the currently displayed Node’s menu, then choose Import Node In.. (resp. Reference Node In..) and browse the file system to find the Node’s rumbafile.
A Node can be saved to a file for further import/reference. To save a Node, right-click it to open its menu and choose Save Nodes As….
To remove a Node, select it and press Delete.
Nodes can be copied (Ctrl + C) or cut (Ctrl + X) and pasted (Ctrl + V) accross the hierarchy. If a Node with the same name already exists, the pasted Node is renamed with an index. Input connections are kept (except for the ones coming from the animation system) and output connections to external nodes are lost.
See also
Customize Nodes
Icon And Color
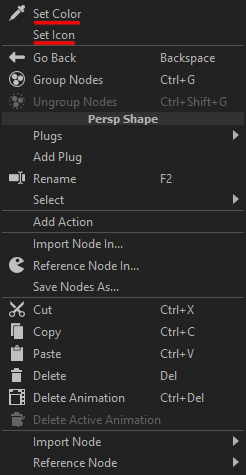
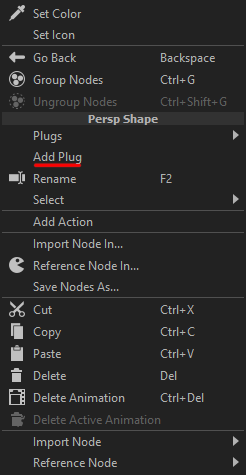
Nodes display can be designed using the Set Color and Set Icon actions in the Node’s menu. The Set Color action opens a ColorPicker popup.
Note
When the ColorPicker popup is open, deselect the edited Node to see its color change live.
Dynamic Plugs can be added to a Node using the Add Plug action. A popup window then opens and allows to provide the Plug’s information.

Node Features
To modify the node features visible in the node editor, select the node, and change the Attribute Editor -> All Attributes -> Graph Properties attributes:
Pos: the node position in the graph
Radius: the node radius
Show Title: display the node title
Show Main Plugs: display the unconnected main plug (the ones flagged main)
Show Arcs: display the plugs arcs
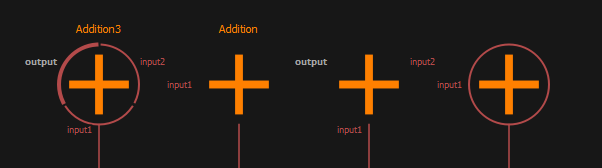
From left to right, the same node with all its features, with only its title, with only the main plugs, with only the arcs.
Connecting Nodes
Nodes are composed of multiple input and output Plugs.
The Evaluation Graph is built by connecting the Plugs of the Nodes:
right-click the source Node and choose Plugs then the desired source Plug, then choose Connect…
right-click the destination Node and choose Plugs then the desired destination Plug, then choose To…
A connection can also be created by:
left-clicking either the label of the source Plug or the connection circle under the source Node, the connection arc then follows the mouse.
releasing the mouse
in the void, stopping the connection creation
on the destination Plug label
on the destination Node
If the connection’s source is the connection circle of the source Node, or if the connection’s destination is the destination Node, then a double-column widget opens to ask for the source and destination plugs.
Note
The Evaluation Graph is a Direct Acyclic Graph, hence:
Evaluated Plugs cannot be the destination of connections (the To… action is disabled).
A non-evaluated Plug can be the source of multiple connections, but the destination of one and only connection at a time.
A Plug cannot be connected to one of its dependencies (the To… action is then disabled).
Note
Connections can be made only if the Value types of the source and destination Plugs are compatible.
Connections are displayed using Spline arcs with an arrow mark indicating the direction, the color of the arc depending on the Value type of the source plug. Connections coming from a reference file are displayed as frozen.

Note
The display position of a connected Plug is automatically reordered so that it is closest to the connection’s other end.
The destination Plug of a connection can be changed by left-clicking the connection arc and releasing the mouse on the new destination Node / Plug. If the mouse is release in the void, then the connection is removed.
Connections can also be removed using the Disconnect (resp. Disconnect Outputs…) action from the destination (resp. source) Plug’s menu.
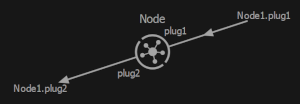
Connections can be done accross the Node hierarchy, in which case it is represented as an arrow coming from / pointing to the void, with the name of the source / destination Node and Plug
Nodes Overlay
To improve the visual aspect of the Node Graph, Nodes can be moved around by simply dragging them.
Nodes can be resized using the resize mark on its bottom right corner.
A Dot Node can be created on a connection with Ctrl + left mouse click on the connection arc. A Dot Node has no other meaning than allowing to improve the connections display.


A Frame Node can be used to visually separate Nodes by context or add some documentation / information as Qt Rich Text.

Grouping Nodes
Nodes that are under a same parent Node can be grouped, i.e. put inside an intermediate parent Node, by using the Group Nodes action (Ctrl + G). All input and output connections to other nodes are then split as follows:
for each connection source a dynamic Plug is created on the intermediate parent Node
for each input connection, its destination is set to the dynamic Plug for the source, and a new connection is created from the dynamic Plug to the initial destination Plug
for each output connection, its source is set to the dynamic Plug for the source, and a new connection is created from the initial source Plug to the dynamic Plug
Nodes can also be ungrouped, if their parent is of class Node, by using the Ungroup Nodes action (Ctrl + Shift + G). All connections going from or to an internal Node’s Plug and through a Plug of the parent Node are replaced by direct connections between the actual source and destination Plugs.
Note
The parent Node’s Plugs that are not part of such a connection are lost.